Deploying our First Contracts with Embark Framework
Since we installed Embark Framework and made a quick tour of it, we’ll now use.
What you will learn
- Where deploying our first contracts with embark framework fits into an Ethereum application.
- Which assumptions should be tested before a mainnet deployment.
- What to read next when this concept is working.
Since we installed Embark Framework and made a quick tour of it, we’ll now use it to create our first DApp: Decentralized Application. Our DApp will have two parts:
- Smart contract – It will live on the blockchain and handle the logic of our application. Coded with Solidity.
- User interface – Will let normal users interact with the contract and is built with standard web technologies: HTML, CSS, Javascript.
Our DApp will be a decentralized micro blogging platform (read Twitter clone). The functionalities will be:
The same engineering term can describe different protocol rules. Use the protocol-level Bitcoin versus Ethereum guide.
- A user can register
- A user can post a message
- List all the accounts
- List all the messages of a user
Our application will be called MDB which stands for Micro Decentralized Blog. For this we will write two smart contracts, the first one is the actual application that will store all the accounts and let the user register: MDBService. The second part will be the user account containing all the tweets of the user: MDBAccount. When a user register using the application contract, it will actually create an account and store it’s address similar to what we did in our article about factories.
In this tutorial we will only write the smart contract part, we’ll cover the user interface and other topics such as writing tests in next tutorials.
Ethereum calls and Bitcoin spends use different state models. Compare them with Bitcoin transaction structure and confirmation rules.
First, we will use Embark Framework to create our code base. In your favorite terminal type:
embark new MDB cd MDBEmbark created the folders for our application, you can load the folder in your favorite IDE and we’ll create our first Smart contract: the user account. We will call it MDBAccount.sol and place it in the folder app/contracts .
To compare network design without reducing it to tickers, use the crypto issuance, control, use-case, and risk comparison.
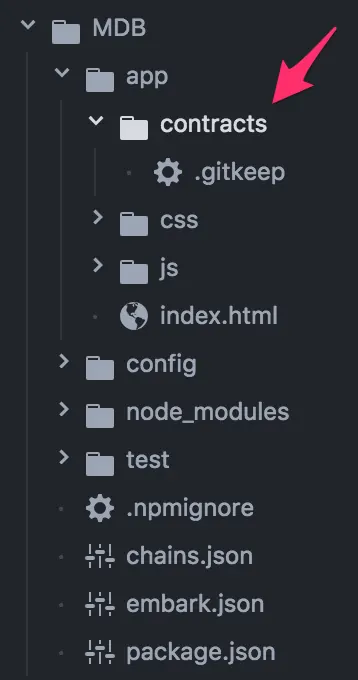
We will use the struct keyword to define a new type, a Post. A Post will store the message that was posted and the timestamp the user posted the message.
struct Post { uint timestamp; string message; }If you already followed the basic tutorials, the code is pretty straightforward:
pragma solidity ^0.4.7; contract MDBAccount { struct Post { uint timestamp; string message; } uint public numberPosts; address public owner; mapping (uint => Post) posts; modifier isOwner() { require(owner == msg.sender); _; } function MDBAccount(address _owner) { owner = _owner; numberPosts = 0; } function post(string message) isOwner() { require(bytes(message).length <= 160); //We check the message is under 160 characters posts[numberPosts].timestamp = now; posts[numberPosts].message = message; numberPosts++; } function getPost(uint postId) constant returns (string message, uint timestamp) { require(postId < numberPosts); //We check that the post exists message = posts[postId].message; timestamp = posts[postId].timestamp; } function getOwnerAddress() constant returns (address _owner) { return owner; } function getNumberPosts() constant returns (uint _numberPosts) { return numberPosts; } }We will try and deploy this first contract. In a terminal we will start our testing blockchain:
embark simulator
and then in an other terminal window:
embark run
We can see our contract was deployed.
So let’s try to see if our contract works, we’ll access the contract from the console using: MDBAccount.getNumberPosts().toNumber() and MDBAccount.getOwnerAddress .
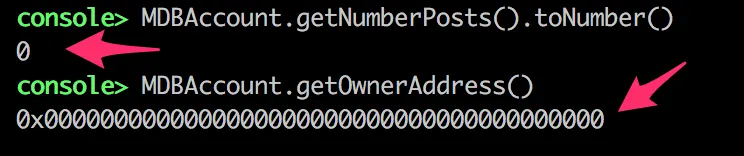
As you can see, we have a serious problem, the owner address is set as 0x00 which is definitely not ours. So due to the modifier we won’t be able to interact with our contract. We need to tell Embark to supply our address as the first argument of the constructor.
For this, we’ll go in the config/contracts.json file and past the address of our contract. To know it, just type: web3.eth.accounts[0] in the Embark console. Mine is: 0x4d89d68b3325e620339fbd3c5ad7c4a8c22cd7dd . So let’s add it on the contracts configuration file:
{ "default": { "gas": "auto", "contracts": { "MDBAccount": { "args": [ "0x4d89d68b3325e620339fbd3c5ad7c4a8c22cd7dd" ] } } } }If you save the file, you’ll see that the Embark console will deploy the contract again automatically, we can now play with our contract:
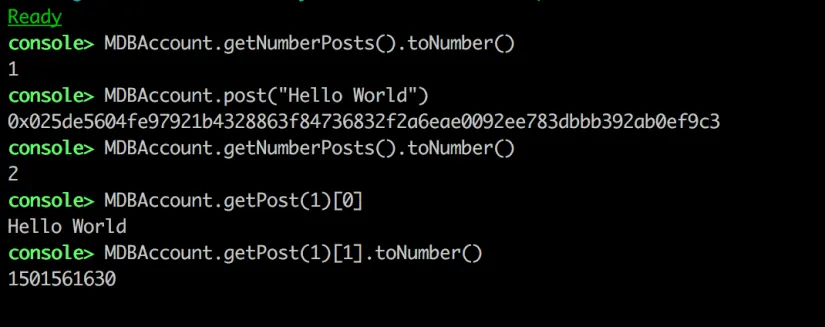
You can try yourself using the following calls:
- MDBAccount.getNumberPosts().toNumber()
- MDBAccount.post(“Hello World”)
- MDBAccount.getPost(0)[0] //Getting the message of the post
- MDBAccount.getPost(0)[1].toNumber() //Getting the timestamp
It was nice to play around with our simple contract, we will now make the MDBService in a new app/contracts/MDBService.sol file which will be in charge of managing the accounts. As our MDBService contract will use the MDBAccount contract we need to import it. The import keyword just copy the content of a file.
import "MDBAccount.sol";The whole code for registering our new accounts and retrieving them:
pragma solidity ^0.4.7; import "MDBAccount.sol"; contract MDBService { mapping (address => address) accounts; mapping (uint => address) ids; uint numberAccounts; function MDBService() { numberAccounts = 0; } function register() { require(accounts[msg.sender] == 0); //We check if the user is already registered ids[numberAccounts] = msg.sender; accounts[msg.sender] = new MDBAccount(msg.sender); numberAccounts++; } function getAccount(address adr) constant returns (address account) { return (accounts[adr]); } function getAccountId(uint id) constant returns (address account) { return (accounts[ids[id]]); } function getNbAccounts() constant returns (uint nb) { return (numberAccounts); } }As the accounts contract will be created by our MDBService contract, we need to specify to Embark that we don’t want it to be deployed in the file config/contracts.json .
{ "default": { "gas": "auto", "contracts": { "MDBAccount": { "deploy": false, "args": [ "0x4d89d68b3325e620339fbd3c5ad7c4a8c22cd7dd" ] } } } }Now your contract should appear as not deployed in the list.
We can quickly test our contract by calling register and get the address of our account with the console.
MDBService.register({gas:900000}) //as creating a new contract from this call we need to set the gas cost to a hight value MDBService.getAccountId(0) // Will return the address of our accountThis is everything for the smart contract part of our brand new DApp. We voluntary didn’t test much interacting with the service and sending data to our post through it because in the next tutorial we will cover good practice for testing your smart contracts with Embark Framework.
Turn the example into production evidence
A working demo is the beginning of verification, not the end. Add tests for failure paths, inspect every permission, and record the chain, contract address, compiler, and dependency versions used for the deployment.
Check behavior
Test expected inputs, boundary values, reverts, events, and calls made to other contracts.
Check operations
Plan key storage, monitoring, pause or upgrade authority, and a response if an assumption stops being true.