Waiting for a Transaction to be Mined on Ethereum with JS
In the previous tutorial we learnt how to send a transaction to an Ethereum smart contract,.
What you will learn
- Where waiting for a transaction to be mined on ethereum with js fits into an Ethereum application.
- Which assumptions should be tested before a mainnet deployment.
- What to read next when this concept is working.
In the previous tutorial we learnt how to send a transaction to an Ethereum smart contract, we’ll now see how to wait for a transaction to be mined and get it’s result. When you sbumit a transaction to the blockchain, you’ll receive the transaction hash of the new transaction. In order to wait for the transaction to be mined (time depends on the network you’re using (main or test), the gas price you chose…).
In order to wait for the transaction to be mined by the network we’ll continuously poll the transactionReceipt from our web3 instance until it is different from null. Based on the previous tutorial where we send a small amount of DAI, we want to make sure when the transaction is mined and monitor the change of baance to the receiver account.
For a fixed-precision contrast with wei and ether, use the Bitcoin-to-satoshi integer conversion tool.
As seen before, we define the ERC20 ABI to be able to instanciate the DAI smart contract and call it. It’s important to note that for this tutorial we use ganache-cli to unock a specific account that already owns DAI tokens on the main network.
var Web3 = require('web3'); const ERC20TransferABI = [ { "constant": false, "inputs": [ { "name": "_to", "type": "address" }, { "name": "_value", "type": "uint256" } ], "name": "transfer", "outputs": [ { "name": "", "type": "bool" } ], "payable": false, "stateMutability": "nonpayable", "type": "function" }, { "constant": true, "inputs": [ { "name": "_owner", "type": "address" } ], "name": "balanceOf", "outputs": [ { "name": "balance", "type": "uint256" } ], "payable": false, "stateMutability": "view", "type": "function" }, ] const DAIADDRESS = "0x6b175474e89094c44da98b954eedeac495271d0f" const senderAddress = "0x4d10ae710Bd8D1C31bd7465c8CBC3add6F279E81" const receiverAddress = "0x19dE91Af973F404EDF5B4c093983a7c6E3EC8ccE" const web3 = new Web3('http://localhost:8545'); const expectedBlockTime = 1000; const daiToken = new web3.eth.Contract(ERC20TransferABI, DAIADDRESS); const sleep = (milliseconds) => { return new Promise(resolve => setTimeout(resolve, milliseconds)) } (async function () { let starting_balance = await daiToken.methods.balanceOf(receiverAddress).call(); daiToken.methods.transfer(receiverAddress, "100000000000000000000").send({from: senderAddress}, async function(error, transactonHash) { console.log("Submitted transaction with hash: ", transactonHash) let transactionReceipt = null while (transactionReceipt == null) { // Waiting expectedBlockTime until the transaction is mined transactionReceipt = await web3.eth.getTransactionReceipt(transactonHash); await sleep(expectedBlockTime) } console.log("Got the transaction receipt: ", transactionReceipt) let final_balance = await daiToken.methods.balanceOf(receiverAddress).call(); console.log('Starting balance was:', starting_balance); console.log('Ending balance is:', final_balance); }); })(); We added a small helper function sleep that simply makes the program wait between each request for the transaction receipt. In this example we expect the blocktime to be 1 second as defined in the expectedBlockTime variable. When launching your ganache-cli test network you can define a fixed block time for your blockchain using the option: –blockTime 5 (for a 5 second blockchain) Otherwise ganache-cli will mine the transactions as soon as they appear and not mine any block if you don’t send any transaction.
For display-value checks, compare the application output with the Ethereum and U.S. dollar reference calculator, then account separately for fees and slippage.
Which gives us a result like this and we can see that the balance of the account was modified:
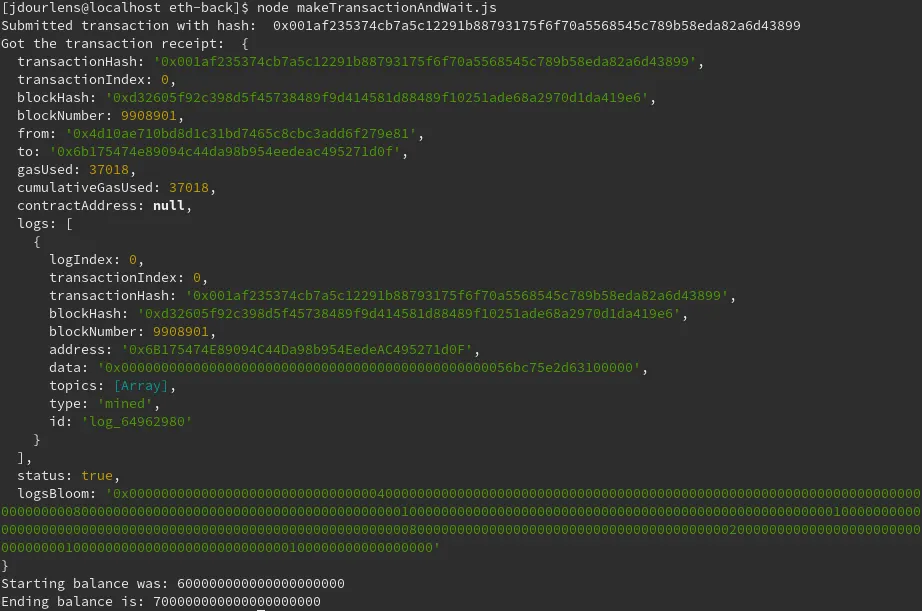
If you want to know if a transaction was successfull or reverted, you need to check the status of the transaction receipt.
Issuance assumptions are easier to see on the Bitcoin supply and halving schedule explorer.
In our case, we see that the transaction emitted one log event which is the Transfer event as defined in the ERC20 token standard.
Turn the example into production evidence
A working demo is the beginning of verification, not the end. Add tests for failure paths, inspect every permission, and record the chain, contract address, compiler, and dependency versions used for the deployment.
Check behavior
Test expected inputs, boundary values, reverts, events, and calls made to other contracts.
Check operations
Plan key storage, monitoring, pause or upgrade authority, and a response if an assumption stops being true.